Authors:
- Rafael Larrosa Jiménez (System Administrator - SCBI)
- David Castaño Bandín (System Administrator - SCBI)
- Manuel Guerrero Claro (System Administrator - SCBI)
For any questions, contact soporte@scbi.uma.es
Index
- 1 - Introduction
- 2 - Access
- 3 - File Movement
- 4 - Hardware Resources
- 5 - File System / Quota
- 6 - Software
- 7 - Notions of Parallelism
- 8 - Queue System
- 9 - Array Jobs
- 10 - Using GPUs
1. Introduction
In Spain, there are a series of public infrastructures called ICTS (Unique Scientific and Technical Infrastructures). Their objective is to provide Spanish researchers with competitive means to carry out cutting-edge research.

A well-known example of this type of infrastructure is the famous telescopes and astronomical observatories located in the Canary Islands. Focusing more on the Andalusian region, we have the Doñana Biological Reserve, the Calar Alto Astronomical Observatory, or the one relevant to this course: the Spanish Supercomputing Network (RES) through the Picasso node.
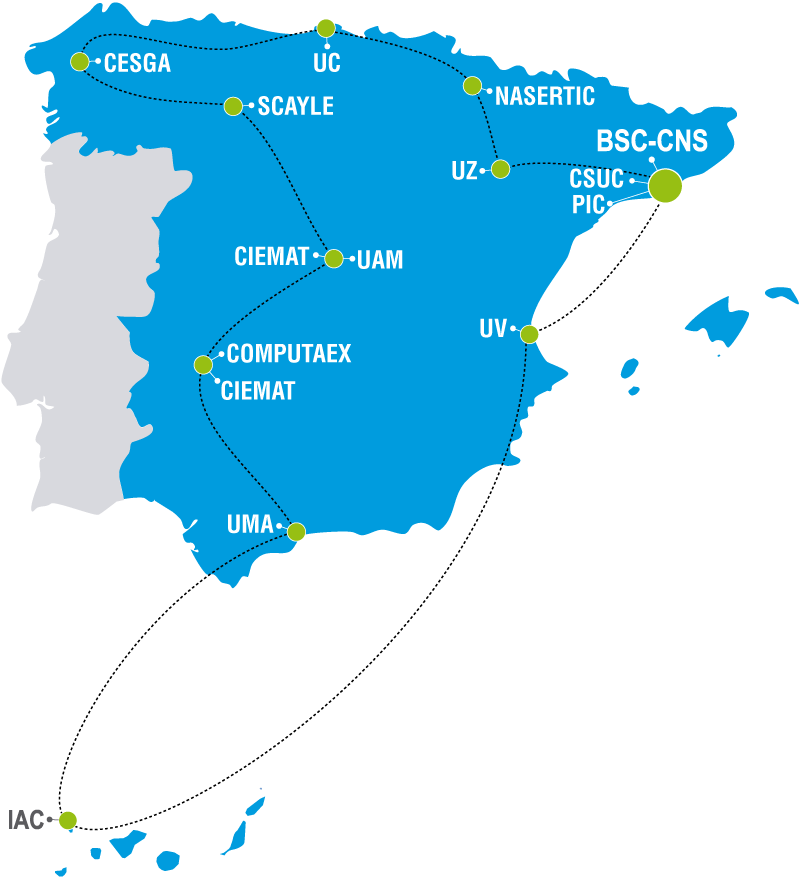
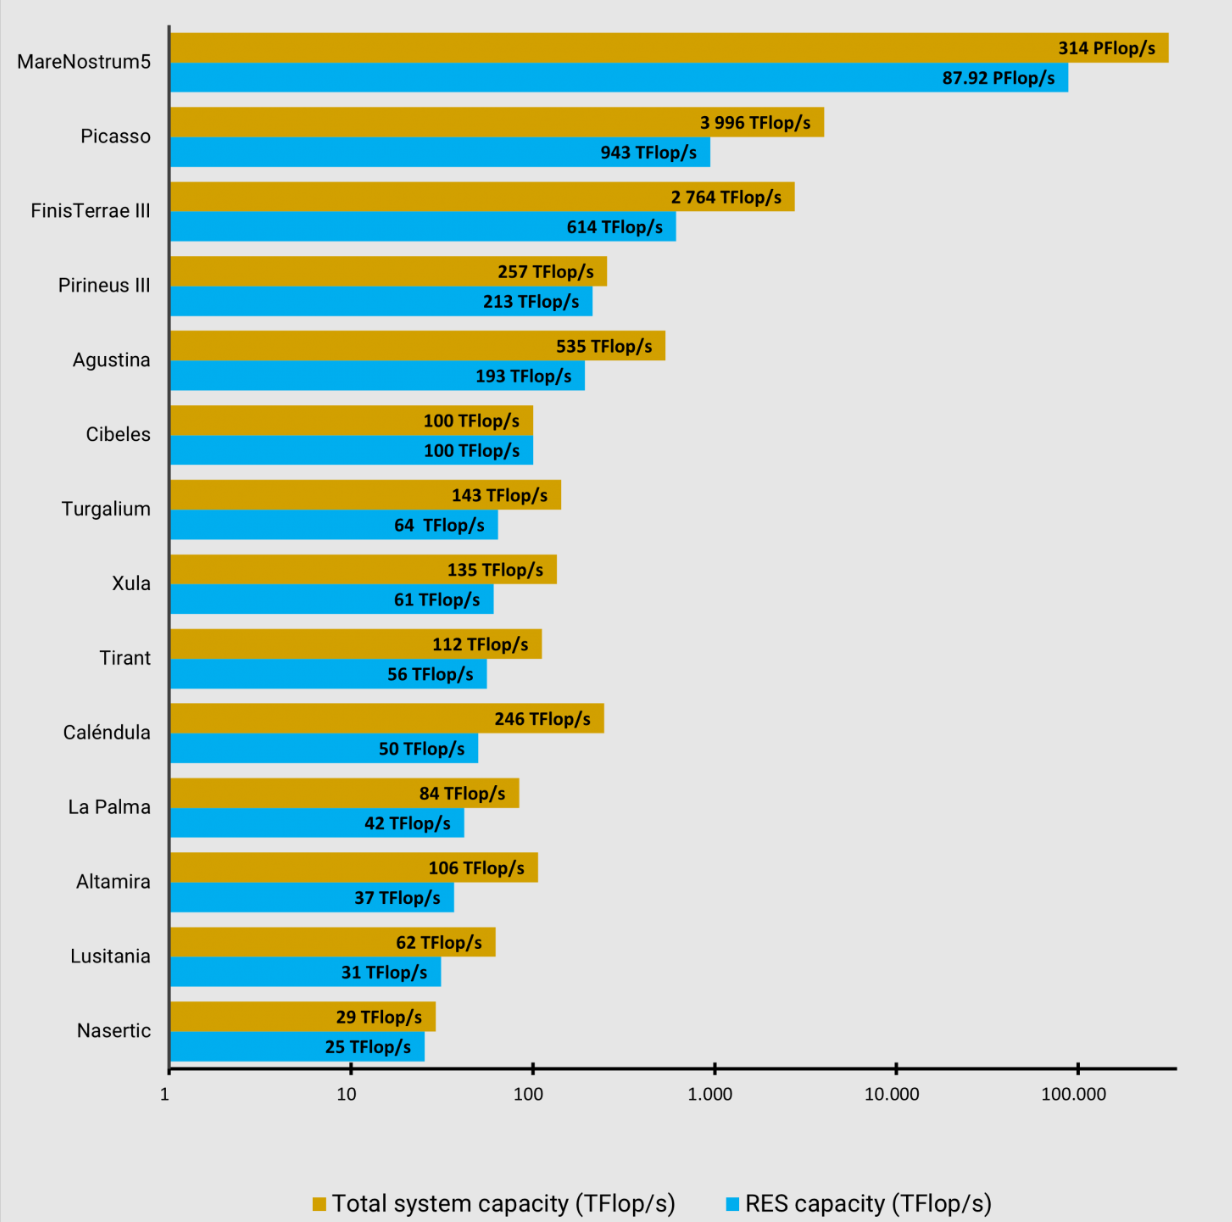
The RES consists of a series of "nodes," that is, a series of supercomputing centers spread across Spain. The SCBI, with its Picasso supercomputer and its 40,000 cores, stands as the second most powerful node of the RES, only surpassed by the well-known Marenostrum, located at the BSC (Barcelona Supercomputer Center).
The SCBI is also involved in Quantum Computing through the QuantumSpain project.

2. Access
Access to Picasso is done using the ssh protocol on the command line:
ssh -X <user>@picasso.scbi.uma.es
Where <user> should be replaced with the corresponding user. This command can be executed in:
- A Linux terminal
- A MacOS terminal
- A PowerShell in Windows
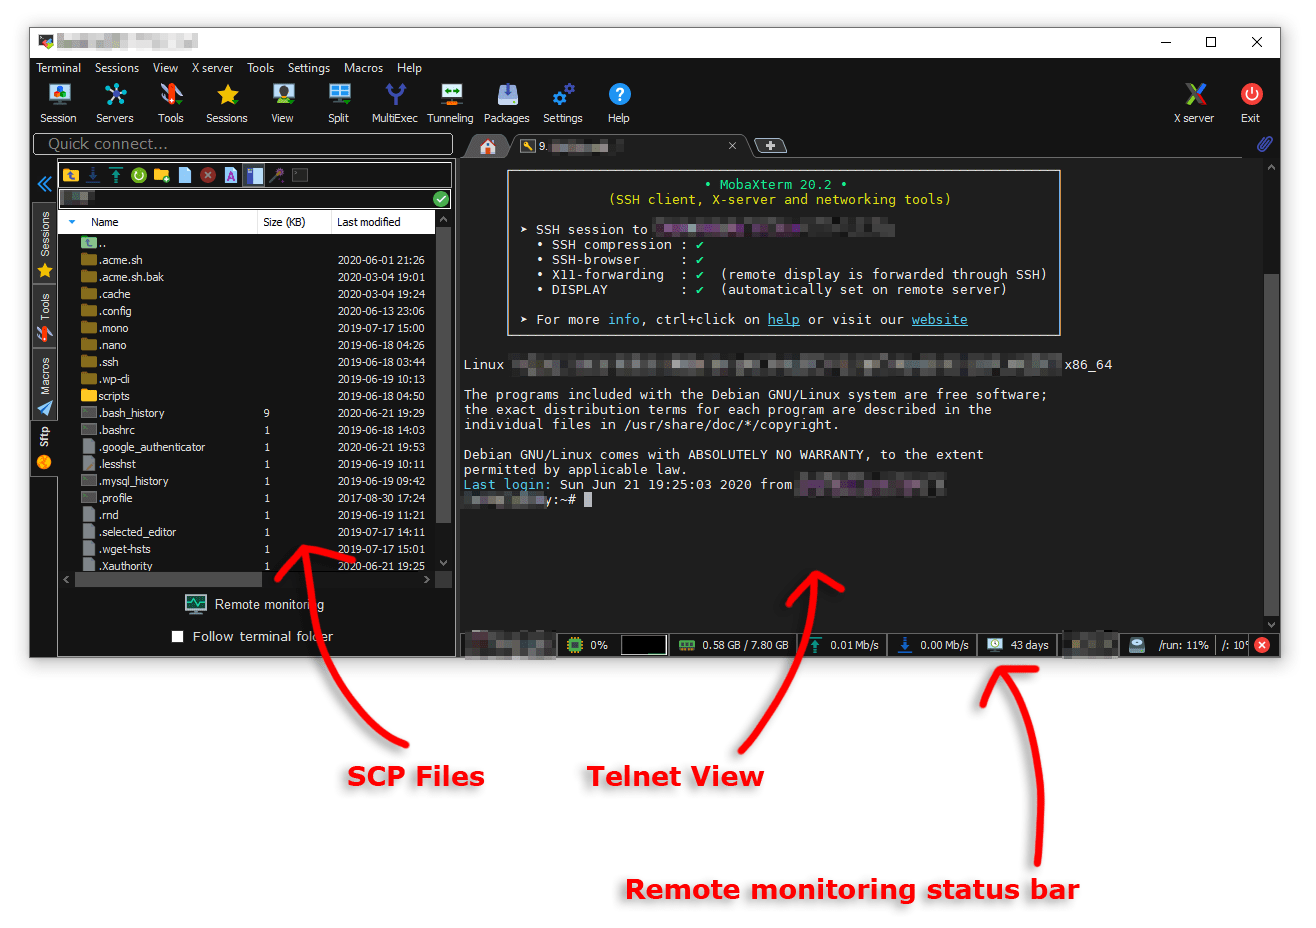
Another option would be to use software dedicated to ssh connections with servers, such as MobaXterm or similar. MobaXterm is a good option for beginners who are not used to handling a terminal, as it features a file explorer (left column), making it easier to navigate between folders and move files between Picasso and the local computer.
3. File Movement
To copy files between Picasso and the local computer, we have two options:
- Use commands like rsync or scp in the terminal
- Use external programs to open a file explorer on Picasso (MobaXterm, Dolphin on Linux, ...)
3.1. The scp and rsync commands
The first thing to keep in mind is that both the commands to copy from the local computer to Picasso, and from Picasso to the local computer, are executed on the local computer. Both commands are used to move files between a local computer and a server, with the rsync command being more powerful and versatile. It is recommended to use rsync if dealing with large files or large quantities of files, as the rsync command can resume copying if it is interrupted.
From the local computer to Picasso
First, we need to open a terminal/PowerShell in the folder containing the files and directories we want to copy. Then, we just need to execute one of the following commands:
scp -r <file> <user>@picasso.scbi.uma.es:<destination>
rsync -CazvHu <file> <user>@picasso.scbi.uma.es:<destination>
where
<file>should be replaced with the name of the file or folder to be copied<user>should be replaced with the Picasso user<destination>: should be replaced with the path to the destination folder on Picasso (Can be obtained using thepwdcommand on Picasso)
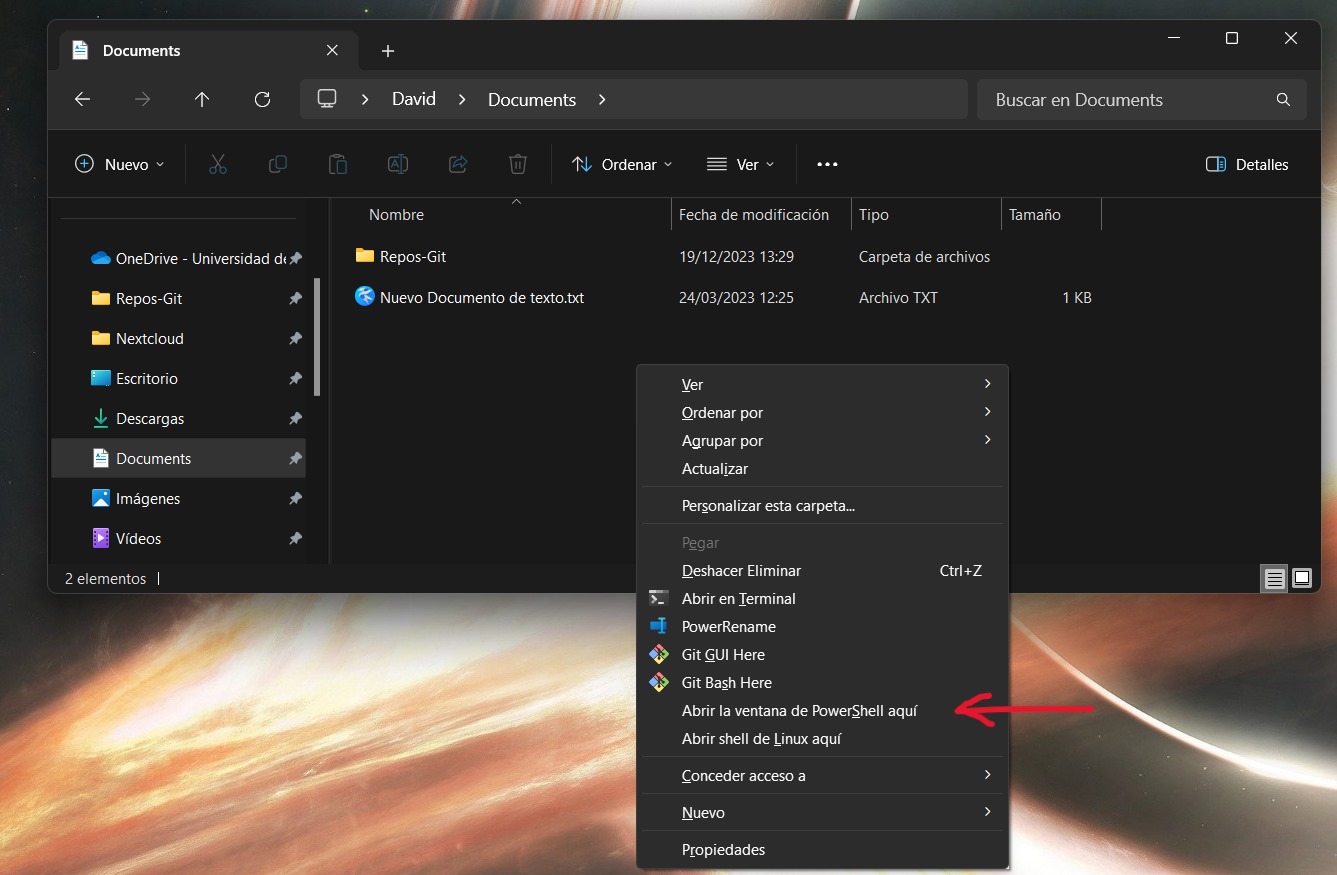
Shift + Right mouse button. This will bring up a menu with additional options, including Open a PowerShell window here.
From Picasso to the local computer
First, we need to open a terminal/PowerShell in the folder where we want to copy the files from Picasso. Then, we just need to execute one of the following commands:
scp -r <user>@picasso.scbi.uma.es:<file> .
rsync -CazvHu <user>@picasso.scbi.uma.es:<file> .
where
<file>should be replaced with the name of the file or folder to be copied<user>should be replaced with the Picasso user- Notice the
.at the end of the command. It is important to include it! (It is the destination path. The dot means "here")
3.2. Moving files with MobaXterm
As mentioned earlier, in the left column of MobaXterm, we can move files between Picasso and the local computer (see the previous Fig.). This can be done simply by dragging the files or using the upload and download file options from the top menu.
3.3. Other alternatives
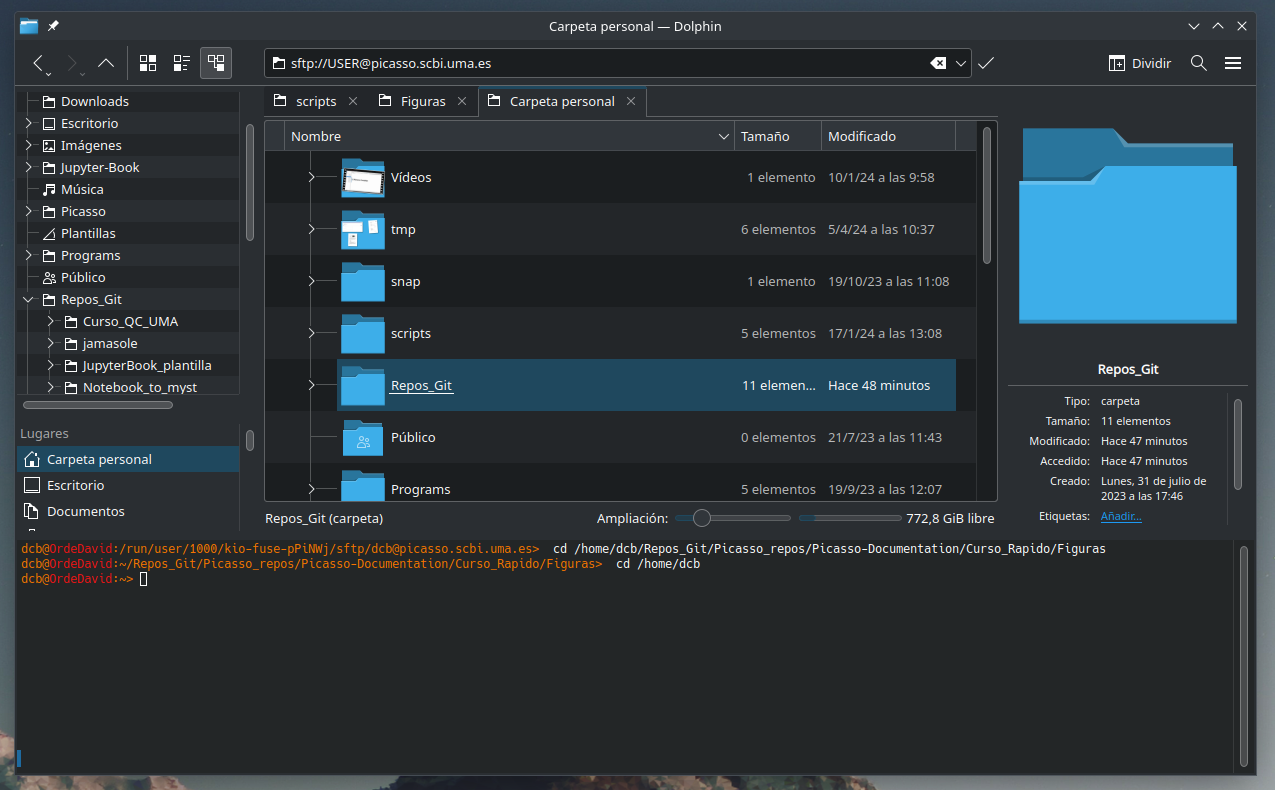
There are a variety of software that allow mounting a server via sftp. For example, in Linux distributions, the file explorer itself usually provides the option to do so.
For instance, in Ubuntu, we just need to open the file explorer and go to Other Locations and type at the bottom (where it says Connect to Server) the command:
sftp://USER@picasso.scbi.uma.es
Where USER should be replaced with the corresponding user.
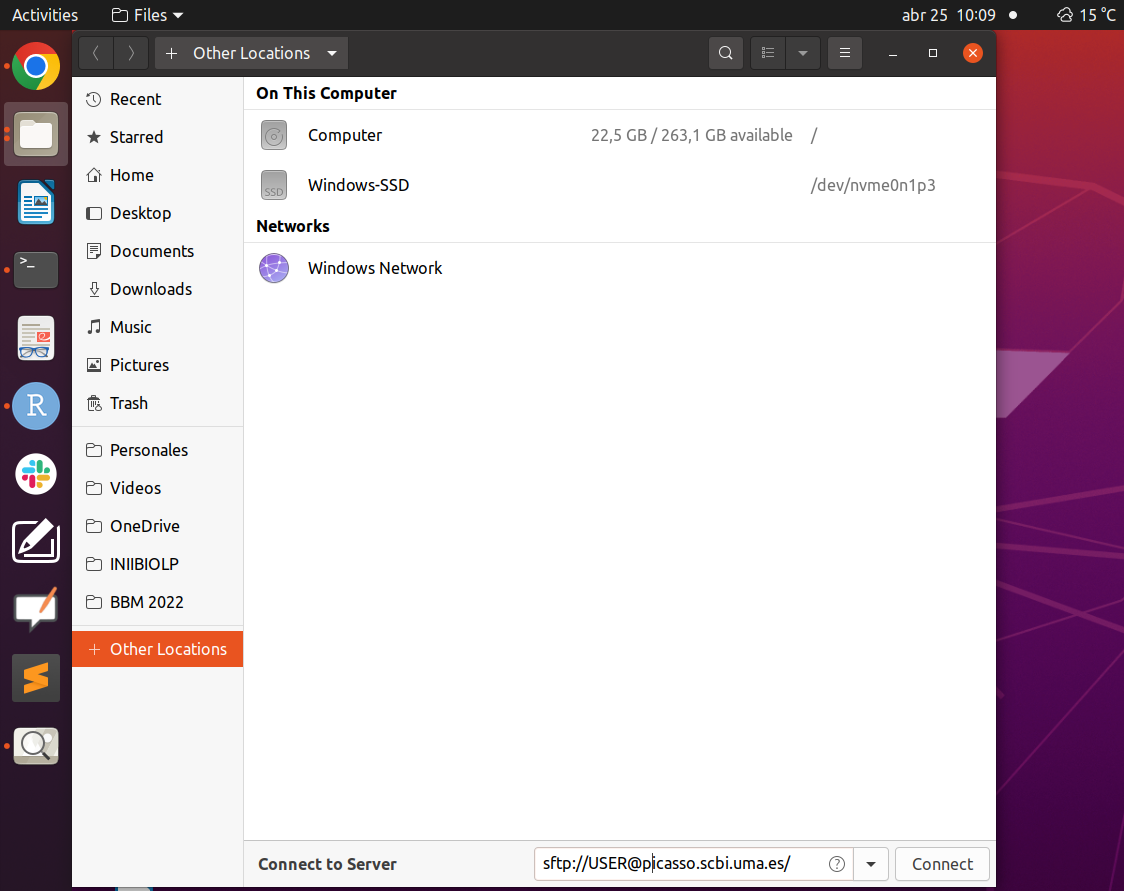
In other file explorers like Dolphin (the default one in OpenSuse with the KDE desktop), you simply type the previous command in the path line.
4. Hardware Resources
Picasso consists of different types of nodes: some with more RAM, others with more cores, some with Intel processors, others with AMD,...
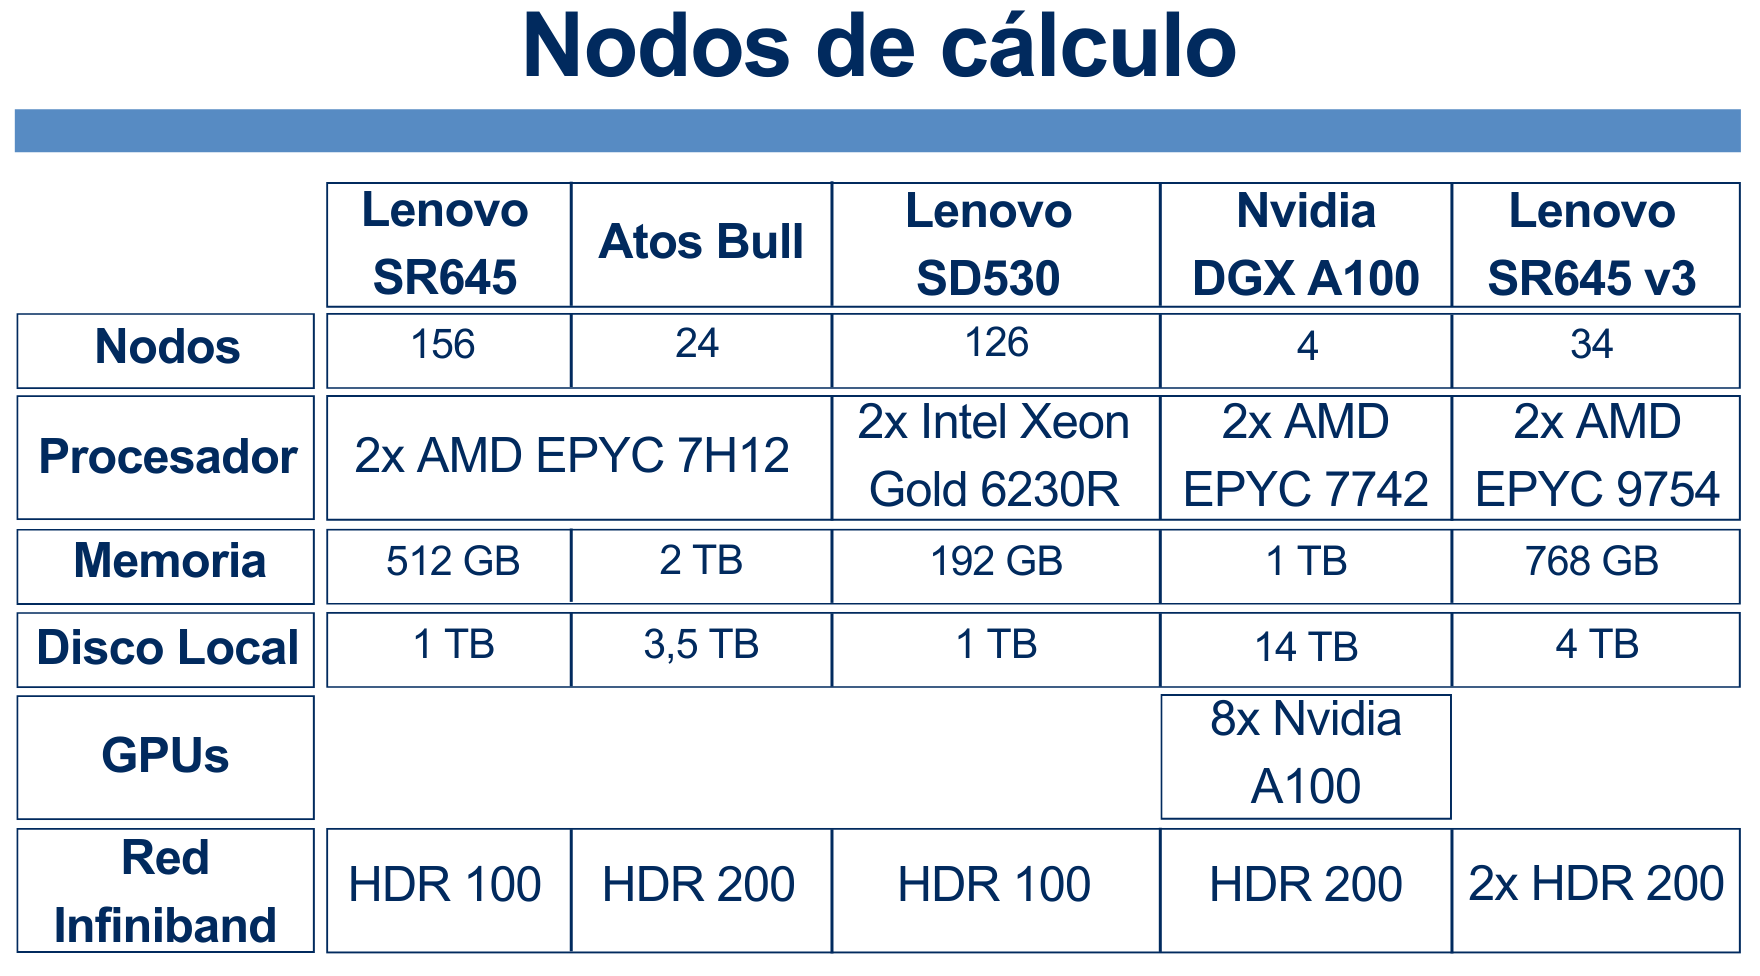
From the user's point of view, there is no need to worry or think about the type of nodes in Picasso. As we will see in the section 7. Queue System, the user only needs to request the RAM, the number of cores, the execution time, and little else, and the system takes care of assigning the resources. The only thing to keep in mind is that nodes with more RAM or more cores are scarce compared to the rest, so if you request very large resources, it may take longer to start your job.
We also see that only 4 nodes have a GPU. We will see in section 10. Using GPUs how to use these nodes.
5. File System / Quota
Picasso consists of two shared file systems (HOME and FSCRATCH), in addition to a local file system of each node (LOCALSCRATCH). Each user has a quota of files and space in HOME and another in FSCRATCH.
5.1. Shared File Systems
These are the ones where the vast majority of work is done:
HOME (Permanent storage system): Here you should store important data, self-developed scripts, final results, and other important files. To return to your home directory, you can use any of the following commands:
cd
cd ~
cd $HOME
FSCRATCH (Temporary storage system): FSCRATCH is a high-speed storage where you should launch your jobs. This system is temporary, meaning it has an automatic deletion policy for old files (more than 2 months). It is important to remember to copy important results to HOME once the job execution is complete. To access it, you can use the command:
cd $FSCRATCHYou can copy folders from HOME to FSCRATCH using a command like:
cp -r $HOME/path/to/your/folder/in/home $FSCRATCH/path/to/target/folderor from $FSCRATCH to $HOME by using
cp -r $FSCRATCH/path/to/your/folder/in/fscratch $HOME/path/to/target/folder
5.2. Quota
Each user has a quota of files and space in HOME and another in FSCRATCH. The quota can be checked using the command
quota
When any of the quotas have been exceeded, a message will appear upon entry to Picasso warning about it. This message can be viewed again using the quota command.

As we can see in the image, there is a quota of space (in GB or TB) and another of number of files. We also see that there are two types of quotas:
- Quota (soft quota): Once any of the soft quotas are exceeded, a grace period of 7 days is granted to return to the normal situation. After these 7 days with the quota exceeded, writing is blocked.
- Limit (hard quota): The hard quota cannot be exceeded. When it is reached, writing is blocked.
6. Software
Picasso has a wide variety of pre-installed software. This list can be checked either on the center's website or using the command
module avail | grep -i software_name
To load software, use the command
module load software/version
To see the loaded modules, use the command:
module list
To unload a module, use
module unload software/version
To unload all modules, use
module purge
7. Notions of Parallelism
One of the great potentials of a supercomputer is the ability to execute processes with massive parallelism (hundreds or thousands of executions in parallel). Due to this, it is worth discussing some notions of parallelism in programs. When we talk about the parallelism of a program, we refer to the program's ability to execute certain parts simultaneously instead of sequentially.
When we talk about parallelism, there is a famous principle known as Amdahl's Law, which tells us the speedup we will achieve in a process by increasing the number of cores, depending on how large the parallel part of the program is (a program can have parts that must be executed sequentially and parts that can be parallelized).
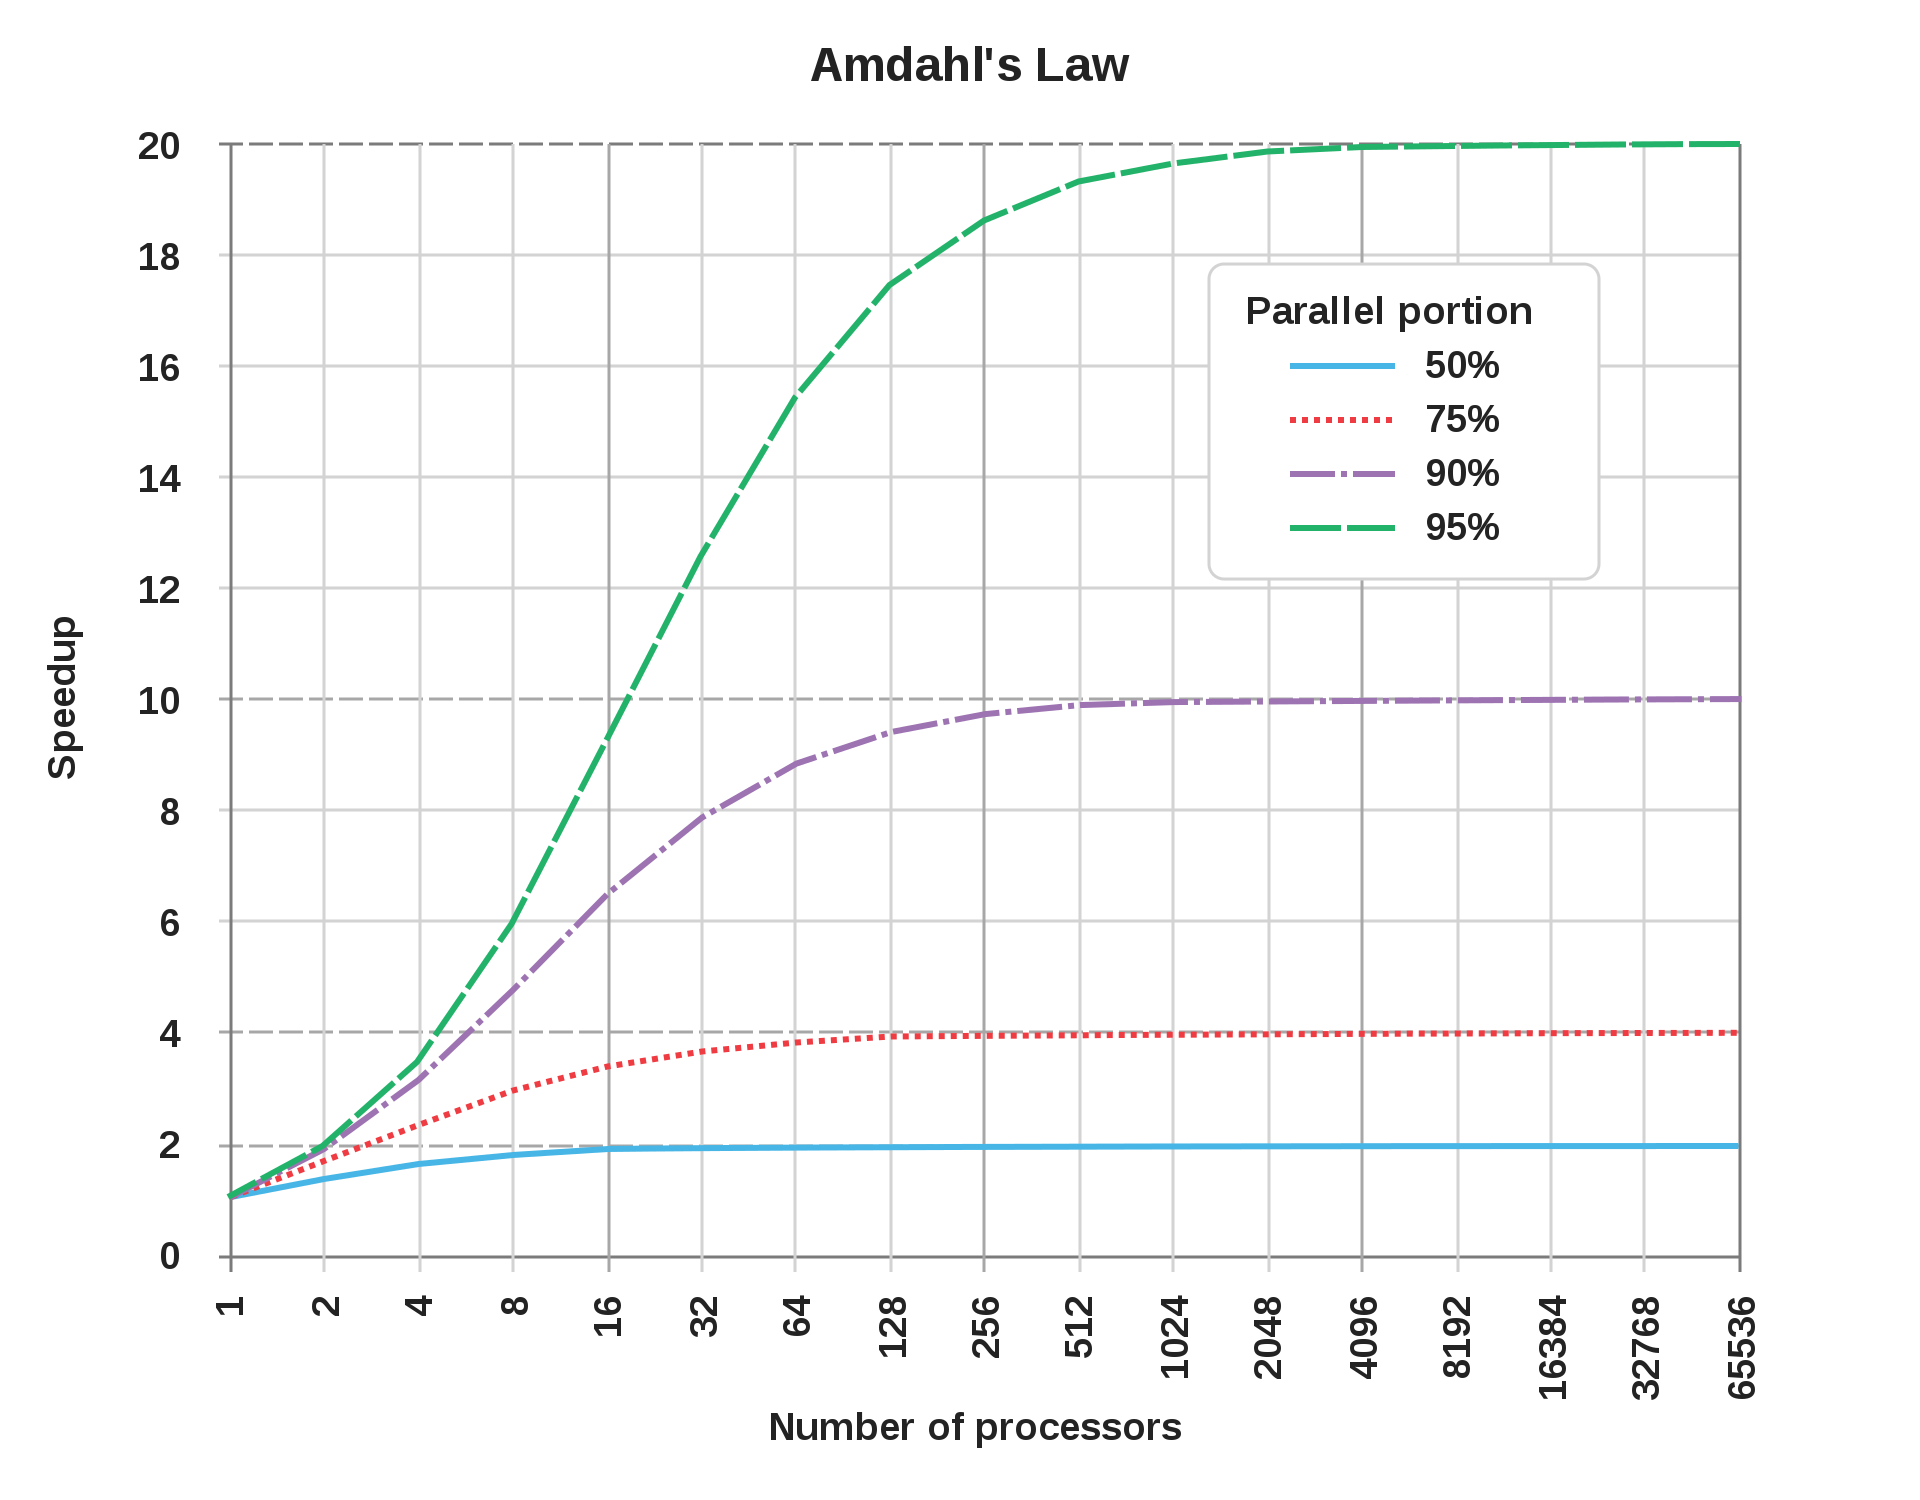
This law shows us that the sequential parts of a program ultimately dictate the maximum speedup that can be achieved through parallelism.
For example, the blue line represents a program where 50% is parallelizable. In the graph, we see that with 16 cores we have already reached the maximum speedup. From there, increasing the number of cores is useless. We also see that the maximum speedup in this case is 2, meaning the program takes half the time. This is because through parallelism that 50% parallel part of the program becomes very fast, while the 50% sequential part still takes the same time.
Let's see another example: in this case, we have a file processing that takes 100 minutes without parallelism. Of these 100 minutes, 10% is sequential and 90% can be parallelized.
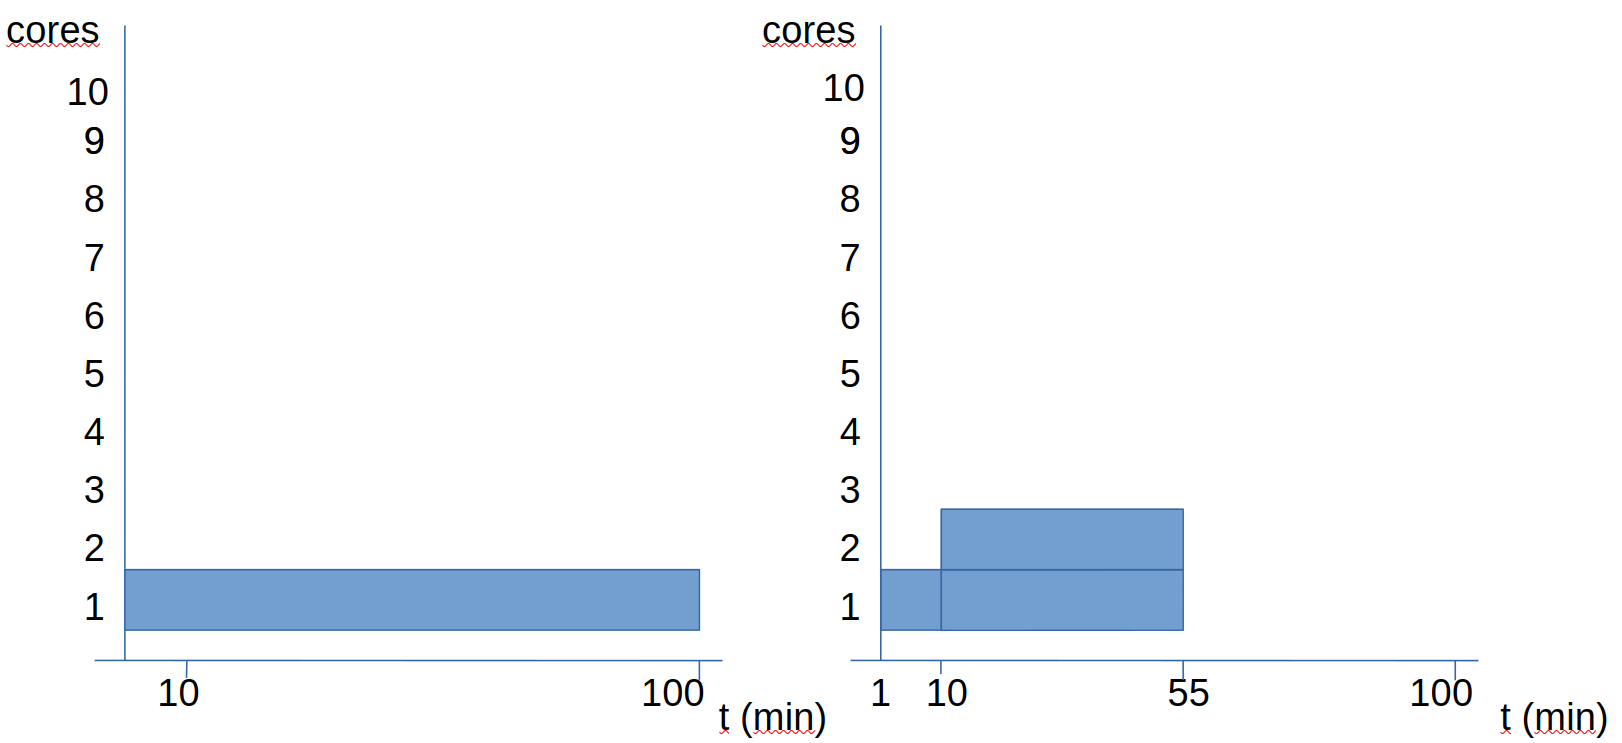
We see that doubling the number of cores, the time goes from 100 to 55 minutes (it doesn't reduce to half). Let's see what happens when we increase more cores:
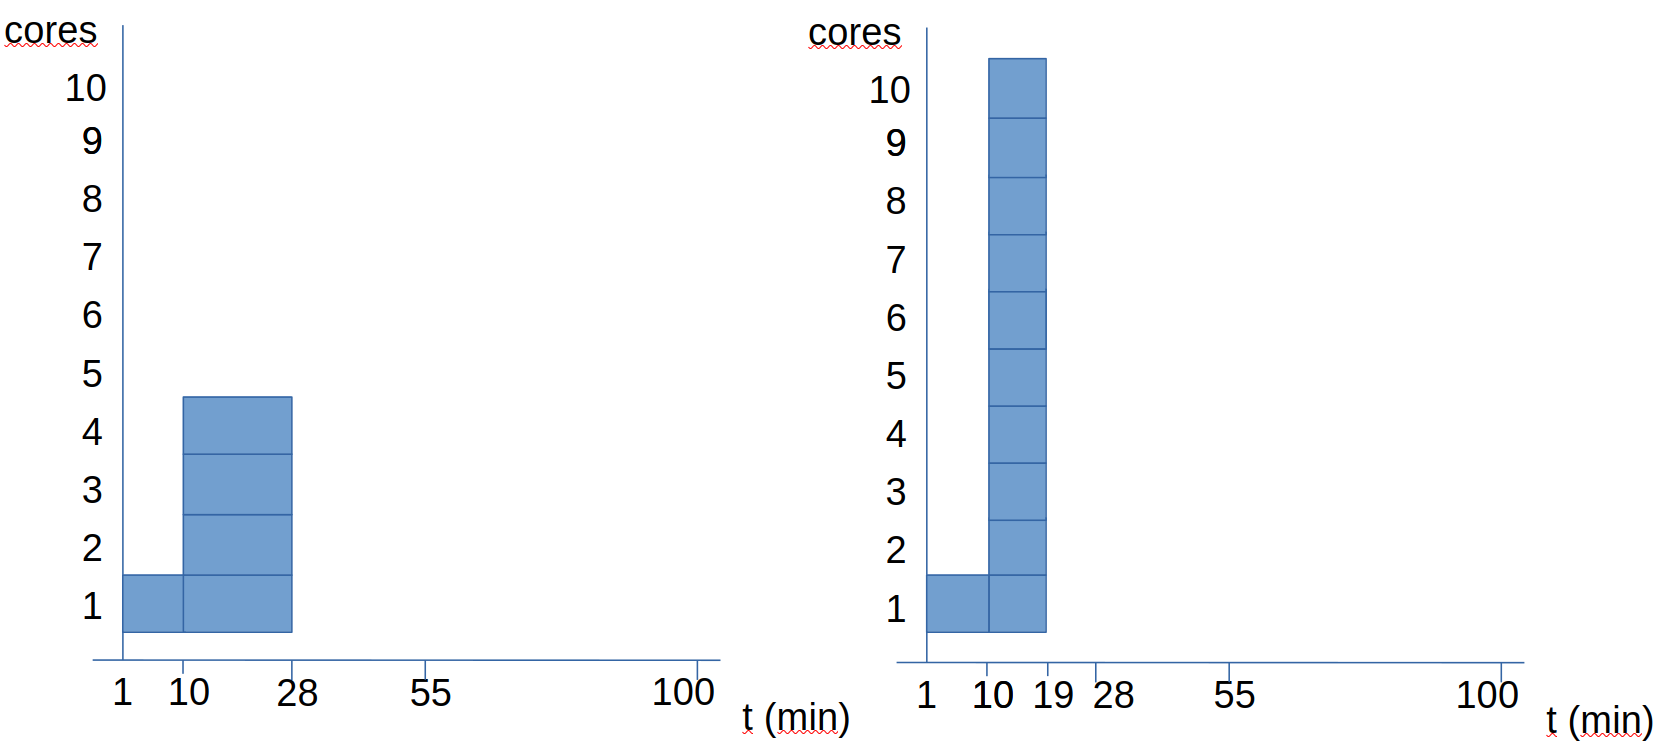
When we go to 4 cores, the time becomes 28 minutes. If we go to 10 cores, the time becomes 19 minutes. If everything were parallel, with 10 cores it should take 10 minutes. However, since we have 10 sequential minutes, we know that this program will take at least 10 minutes.
Continuing with this example (processing a file where 10% of the work is sequential and 90% parallel), the following questions arise:
- How many cores are optimal to process 10 files of this style?
- Is it optimal to use all cores for each job?
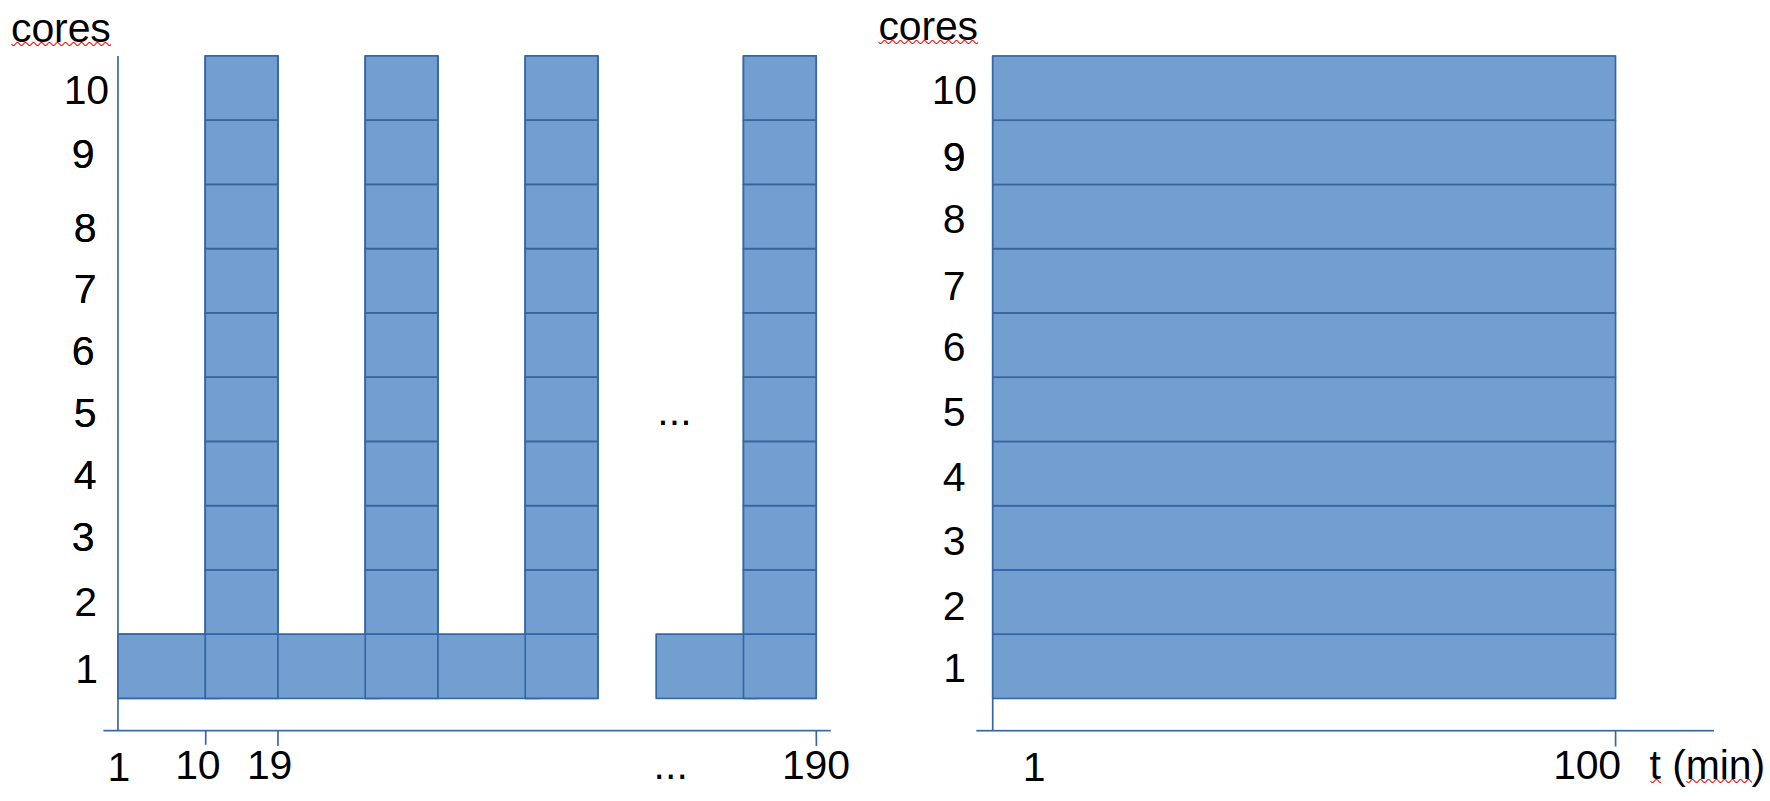
In the previous graphs, we see two options for planning the calculation, both using 10 cores, but we see that one takes almost twice as long as the other:
- The first option is to execute the 10 analyses sequentially, parallelizing each analysis.
- The second option is to execute the 10 analyses in parallel, without parallelizing each analysis.
What we observe is that in this particular case, the second option is more efficient, as it has all cores at maximum usage all the time. In the first option, since the analysis has a sequential part, during each analysis there will be a time when 9 out of 10 cores are idle.
8. Queue System
8.1. Submission File (Simple)
To access all the resources of Picasso, you must use the queue system. When you access Picasso, you access one of the nodes of the supercomputer. The other nodes cannot be accessed directly; instead, jobs are sent to the queue system. To do this, you must write a "submission file" where you specify the necessary resources, load the required modules, and execute the program.
Let's see a simple example of a submission file:
#!/usr/bin/env bash
#SBATCH -J this_is_an_example
#SBATCH --ntasks=1
#SBATCH --cpus-per-task=2
#SBATCH --mem=2gb
#SBATCH --time=10:00:00
#SBATCH --constraint=cal

# Set output and error files
#SBATCH --error=ejemplo_simple.%J.err
#SBATCH --output=ejemplo_simple.%J.out

module load software/version

hostname

time ./mi_programa -t $SLURM_CPUS_PER_TASK argumentos
- The
%Jin the output file names is replaced by the job ID, so the output files do not overwrite each other. - The
-tis because some software needs to be specified with an argument the number of CPUs (cores) to use. Sometimes this is done with-t number_of_cores. In the Slurm queue system, the value set in#SBATCH --cpus-per-task=1is stored in the variable$SLURM_CPUS_PER_TASK, so we can use this variable to tell the software to use all the reserved cores. - If the software uses MPI for parallelism, tasks would need to be set in
#SBATCH --ntasks=1and executed withmpirun -np $SLURM_NTASKS software_executable.
A submission file template (with explanatory comments) can be generated using the command
gen_sbatch_file script_de_envio.sh 1 2gb 2:00:00 'ls -al'
In this command, we are generating a file submission_script.sh where we request:
- 1 core
- 2gb of RAM
- 2 hours of execution time
- The command
ls -alis executed The idea is to edit this template file, setting the appropriate resources, loading the necessary modules, and specifying the relevant execution command.
8.2. Submitting to the Queue System
Once this file is written, it must be submitted to the queue system. This is done using the command
sbatch script_de_envio.sh
You can view the queue with the command
squeue
You can cancel the submission of a job with the command
scancel job_id
where job_id is replaced by the job's ID. The ID can be obtained with the squeue command.
9. Array Jobs
Array Jobs are a way to submit multiple jobs simultaneously by varying a parameter. That is, a single submission_script.sh is submitted and multiple jobs are executed in the queue system with one varying parameter. Let's see an example of an array job submission file:
#!/usr/bin/env bash
#SBATCH -J this_is_an_example_with_arrays
#SBATCH --ntasks=1
#SBATCH --cpus-per-task=2
#SBATCH --mem=2gb
#SBATCH --time=10:00:00
#SBATCH --constraint=cal

# Set output and error files
#SBATCH --error=example_array.%A-%a.err
#SBATCH --output=example_array.%A-%a.out

#SBATCH --array=1-10

module load software/version

hostname
echo a procesar el ${SLURM_ARRAY_TASK_ID}
time ./mi_programa -t $SLURM_CPUS_PER_TASK argumentos_${SLURM_ARRAY_TASK_ID}
We see that there have been 3 changes:
The line
#SBATCH --array=1-10has been added. This line makes it an Array Job by varying a parameter (in this case, from 1 to 10). You can also vary a parameter within a list. This parameter can be used for a series of mathematical operations to pass a specific value to the program. For example, if we want to do simulations varying the temperature from 273 K to 373 K, in increments of 5 degrees, we can set an Array Job as#SBATCH --array=0-10and calculate the temperature asT = 273 + 5*${SLURM_ARRAY_TASK_ID}.${SLURM_ARRAY_TASK_ID}has been added to the name of a supposed program arguments file. This is just to show that the varying value is stored in the variable${SLURM_ARRAY_TASK_ID}and can be used, for example, to call different files in each of the Array Job executions or to perform arithmetic operations with this value (example from the previous paragraph).%Jhas been changed to%A-%a. This is so that the .out and .err files of each Array Job have a different name, containing in this name the value of the parameter we vary (the%a).
10. Using GPUs
Now we will see how to request the use of GPU in the queue system in Picasso:
#!/usr/bin/env bash
#SBATCH --job-name=ejemplo1_gpu
#SBATCH --time=7-00:0
#SBATCH --mem=100G
#SBATCH --ntasks=1
#SBATCH --cpus-per-task=16
#SBATCH --gres=gpu:1
#SBATCH --constraint=dgx

# Set output and error files
#SBATCH --error=ejemplo.%J.err
#SBATCH --output=ejemplo.%J.out


module load software/version

hostname
echo a procesar el ${SLURM_ARRAY_TASK_ID}
time ./mi_programa -t $SLURM_CPUS_PER_TASK arguments
The significant changes are as follows:
- The line specifying the number of GPUs requested has been added:
#SBATCH --gres=gpu:1 - The constraint has been changed:
#SBATCH --constraint=dgx. (Previously it wascal, referring to compute nodes)

